
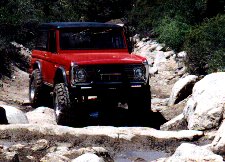
This front view of the Tank shows the new Trans Am air scoop along with the Smittybilt bumper and the Chrome front treatment.
The Tank is not designed as a street rod, though it has plenty of horsepower. It's design, thanks to Mike, is overdeveloped, heavily built components that will take the G forces of the trail. A street rod would be lightly constructed and not focused on durability. For instance, a real feature of the Tank is its two power steering coolers, exclusive to the Tank. Off-road, big tires boil over power steering fluid. Engine cooling and stiff suspension also play into this equation.
This front view of the Tank shows the new Trans Am air scoop along with the Smittybilt bumper and the Chrome front treatment.
These are two different shots of the Tank on a 1997 trip on the Rubicon trail. Notice the chrome treatment on the front.

This is the most recient picture of the Tank. With the newest additions the BFGoodrich MT tires and Nitro rims. A close-up shot of the Nitro rims is the next picture over.


This set of pictures are the old and new oil pan. The one on the left is the old dual sump, dual drain plug pan. The one on the right is the new oil pan. Don't worry, the pan is not as close to the front diff as it seems in the picture.


Here is a shot of the hole that will have to be cut to adapt the new pans to older blocks. Drill out the four rivets out of the
old dipstick mount, punch the rivets out and tap the new oil dipstick mount for 1/4" thread. The old pan probably has an adaptor that runs right into the pan, newer pans have a hole in the block in which the dipstick is inserted. Anyone making this modification will want to buy the oil pick-up with the pan. The new internal dipstick holder in the pan should be removed with something like a Sawzall. This photo shows the old dipstick holder screwed and siliconed into place in the new pan. The second photo is a shot of the new pan with the hole cut in the side of it. This is the bracket that needs to be removed for conversion to older 351 blocks.


SERPENTINE CONVERSION FOR 302/351W V-8'S
Click the link above to see how Mike Boyd did his serpentine conversion on Sherm's Tank.
Wheelwell Screening and Cut Outs
Click the link above to see how Mike Boyd was able to keep the Tank cool and improve access to the engine.
This next photo shows the engine as it now looks. The hood is held open by F-150 springs. You'll note the battery is parrallel to the body. Mike completely encased the battery in a case that extends into the wheel well, as a loose battery can strand you. The engine is a 351W with an Erson cam, dual chain timing chain, Holley 1050 on an Edlebrock hi-rise manifold. There is a 1" spacer under the Holley to allow it to fit better over the hoses and give better high RPM performance. On the passenger's fender
box that contains eight relays and a lot of fuses, including the larger heavy-duty fuses. Mike used a Mallory dual point (centrifugal only advance) because it won't be likely to fry when submerged. In the right hand corner is a chrome top breather for the front and rear differentials. The alternator is a 90 amp from a Ford Tarus that is a bolt-on to the serpentine brackets, it also has a built-in voltage regulator (the alternator) and is easy to rebuild.

In the first photo you saw the Trans Am hood scoop. These four pics give a closer look at that scoop. The first is the Trans Am hood scoop from the side. The second is a front shot of the scoop. The third is a front shot with the hood up. And the forth show the two filters.


Power Steering Conversion for Early Broncos
Click the link above to see how Mike Boyd converted the Tank over to a much more efficient power steering system.
One of the first things to fail is the exhaust. This first picture is a shot of the exhaust system. The mufflers are Edlebrock RPM's, you'll notice that almost every pipe is above the frame. At the front of the picture is a crossover pipe that is tucked behind the transfer case. These pipes are 2 1/2" from stock cast iron headers to reduce heat and noise. The Tank sounds alot like a Cris Craft boat. The installer used every inch to hide the RPM mufflers.
The second shot shows you how tucked up the crossover pipe is. You'll also notice that the pipes are above the frame on most the the vehicle. Cross over pipes are a great way to extract a little more HP from your engine and dramatically reduce the possibility of exhaust backfire. Lets you enjoy that expensive CD player.


This is the old Bronco wiring.

An Efficient Electrical System
Click the link above to see how Mike Boyd used late model Ford parts to completely rewire the Tank.
When I bought the Tank in November of 1996, I thought it had a nice dash, but the wiring was a mess and the old guages took up too much room. Note the wires under the dash.

Click the link above to see how Mike Boyd took the old, cluttered dash out and installed a new billet dash.
Click the link above to see how Mike Boyd Took all the guages from the dash and and put them into a very neat housing above the dash.
This is a photo of the billet dash and custom instrument panel that Mike made from scrap. That is one sharp looking dash!

Mike installed an LED for each rocker switch on the dash to prevent the drain of the battery by forgetting to turn them off in the wilderness. The rocker switches were rewired to remain on wether on or off. This would help finding the switches during night runs and if an LED is lit, there is a reminder that something is on. There are twelve rockers on the dash.

Click the link above to see how Mike Boyd lit up the inside of the Tank using late model Ford components.
This a picture of the retractable light under the hood.

These are the parallel inner and outer tie rod ends, center link, and stabilizer. This eliminates very dangerous "bump steer". When "lifting" a Bronco, these components need to be as close to parrallel as possible to improve handling. Good street handling is very important because you normally have to drive on a street to get to your off-road site.

Here is a shot of my best skidplate. The hitch protects the Dana 60, the 23 gallon gas tank, and the exhaust tips.


Here is a shot of the rear suspension. Dual shocks and all.

These next few shots are what Mike did the the rear leaf spring to reduce friction between the leafs and increase their life.
Mike took the stock 2 1/4" springs off the Tank and lined them with high density plastic. This provided a modest lift, but the purpose was to increase the life of the springs and make them
far more flexable on any surface. It also reduces the noise from the springs. (first pic) Here is the heavy duty spring brackets Mike used to hold the leaves together. This is an often
neglected area of reinforcement that can result in breaking your rear suspension and damaging your Bronco when the leaves fan out. The a stainless steel allenhead bolt was used to secure
the bracket to the springs. (second pic) These are the 1/4" sheets of plastic used to lubricate the leaf springs. They are available in plastic and surplus shops. The military uses alot of this stuff as a replacement for Teflon. (third pic)


Although the Tank is designed for demanding off-roading, it is also designed to get there on-road. It is just not a street rod like many EB's are, nor is it intended for a specific type of off-road driving. The intent is to make it easy to operate in any environment.
BACK to my Project Vehicles page.